OpenAI의 API에 기능을 도입한 것은 채팅 모델의 기능이 크게 발전했음을 나타냅니다. 이 기능은 현재 API에서 사용할 수 있으며 이 글을 쓰는 시점을 기준으로 사용할 수 있습니다.gpt-3.5-turbo-0613gpt-4-0613
기능이 추가됨에 따라 GPT는 이제 서버 측 작업과 더 복잡하게 상호 작용할 수 있는 기능을 갖게 되어 완전히 새로운 응용 프로그램 배열을 열 수 있습니다. 데이터베이스에서 데이터를 가져오거나, 다른 API와 상호 작용하거나, 개발자가 정의한 사용자 지정 로직을 실행하는 등 기능을 추가하면 AI의 기능이 "단순한 챗봇"을 넘어 효과적으로 확장됩니다.
이전에는 Toolformer 모델을 사용하거나 LangChain과 같은 라이브러리가 있는 에이전트를 사용하여 이 작업을 수행했습니다

OpenAI 의 기능은 무엇입니까?
OpenAI의 맥락에서 "함수"는 AI가 대화 중에 활용할 수 있는 사용자 지정 작업 또는 루틴을 나타냅니다. 이를 통해 개발자는 비즈니스 논리를 채팅 모델에 직접 통합할 수 있으며, 이는 특정 응용 프로그램 도메인에서 중요할 수 있습니다.
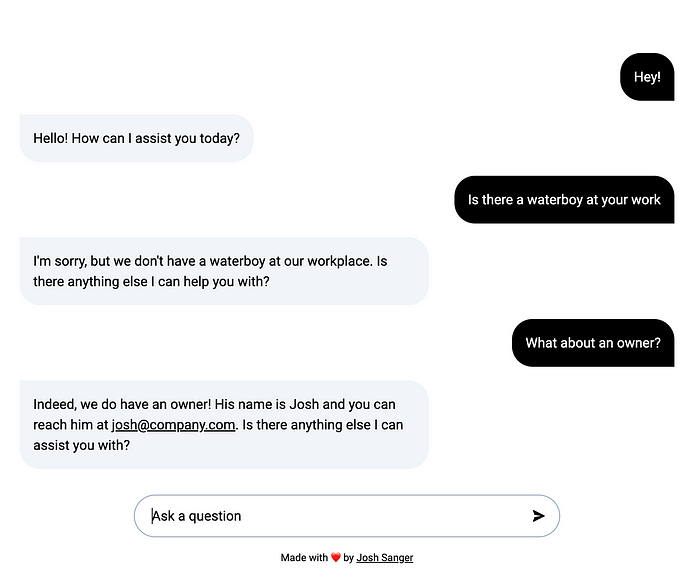
예를 들어, AI가 조직의 직원에 대한 정보를 제공하는 임무를 맡은 경우를 생각해 보십시오. 기능이 없으면 개발자는 모든 관련 데이터를 AI에 미리 로드해야 하며, 이는 데이터 크기 및 기밀성 측면에서 상당한 문제가 될 수 있습니다.
함수는 AI가 필요한 데이터를 "요청"하도록 하여 보다 유연한 대안을 제공합니다. 채팅 모델에 특정 정보(예: 직원의 연락처 세부 정보)가 필요한 경우 함수 호출을 실행할 수 있습니다. 그런 다음 서버는 기능(예: 데이터베이스 조회)을 수행하고 결과를 AI 모델로 다시 반환한 다음 반환된 데이터를 기반으로 대화를 계속합니다.
이 기능은 AI 모델의 잠재적 사용 사례를 크게 향상시켜 AI 모델이 내장된 시스템과 더 긴밀하게 상호 작용할 수 있도록 하는 동시에 데이터 보안과 효율성을 향상시킵니다. AI에게 "말하는" 능력 외에 "행동"할 수 있는 능력을 부여하는 것과 같습니다.
예를 들어 보겠습니다!
필수 구성 요소
시작하기 전에 다음 사항이 있는지 확인하세요.
- JavaScript에 대한 기본 지식
- 컴퓨터에 설치된 Node.js 및 npm
- OpenAI API 키
OpenAI의 API를 처음 사용하는 경우 Remix를 사용하는 시작 자습서를 확인하세요
설치
시작하기 전에 를 실행하여 OpenAI 라이브러리를 설치했는지 확인해야 합니다.npm install openai
기능 사용 방법(단계별)
API를 초기화합니다.
OpenAI API는 OpenAI 패키지의 클래스로 초기화됩니다. (이 초기화에는 API 키가 필요합니다.)OpenAIApi
const conf = new Configuration({
  apiKey: [your-super-secret-key-here]
});
const openai = new OpenAIApi(conf);
함수를 만듭니다.
이 기능은 필요하다고 판단될 때 GPT에서 요청합니다(다음 단계 참조).
지금은 매우 간단하게 만들어 보겠습니다 - 직원의 이름과 이메일이 포함 된 객체를 반환하는 함수로, 사용자가 없습니다.
const getStaffInfo = (staffPosition) => {
  switch (staffPosition) {
    case 'author':
      return {
        name: 'Rebecca',
        email: 'rebecca@company.com'
      };
    case 'owner':
      return {
        name: 'Josh',
        email: 'josh@company.com'
      };
     default:
      return {
        name: 'No name found',
        email: 'Not found'
      };
  }
}
채팅 완료를 만듭니다.
이 메서드는 채팅 프롬프트를 만드는 데 사용됩니다. 이 메서드는 사용할 AI 모델, 초기 시스템 메시지, 일련의 메시지 기록 및 대화에 사용할 새 함수 배열을 비롯한 여러 매개 변수를 사용합니다. 여기에서 함수를 참조할 것입니다.createChatCompletiongetStaffInfo
자세한 내용은 문서를 확인하지만 기본적으로 배열의 각 함수를 설명해야 하며 GPT를 사용하기 위해 함수에 전달해야 하는 매개변수도 지정해야 합니다. 우리 기능에서는 GPT가 직원 정보를 반환하기 위한 필드로 전달되어야 합니다. 그런 다음 로 설정합니다. 이를 통해 GPT는 함수를 사용해야 하는 시기를 결정할 수 있습니다.functionsgetStaffInfostaffPositionrequiredfunction_callauto
const systemPrompt = `You are a helpful directory assistant.
  Users will ask questions about staff and you will reply in a friendly tone
  with the name and email of the person. If you receive a "no name found"
  response, politelty let the user know there is no one by that title who
  works here. Do not make up people. The email should be a link
  (e.g. [person@email.com](person@email.com)`;

const chat = await openai.createChatCompletion({
  model: 'gpt-3.5-turbo-0613',
  temperature: 0.2, // setting this lower to reduce hallucinations
  messages: [
    {
      role: 'system',
      content: systemPrompt,
    },
    ...chatHistory, // An array of messages sent previously in the same session
    {
      role: 'user',
      content: message, // the user's latest message
    },
  ],
  functions: [
    {
      name: "getStaffInfo",
      description: "Get the contact info of a staff member",
      parameters: {
        type: "object",
        properties: {
          staffPosition: {
            type: "string",
            description: 'The position of the desired staff member. E.g. "author" or "owner"',
          },
        },
        required: ["staffPosition"],
      },
    },
  ],
  function_call: 'auto',
});

// setting as let since we will overwrite later
let answer = chat.data.choices[0].message?.content;
GPT가 기능을 사용하는지 확인:
API 응답의 일부로 포함됩니다. 사용자에게 메시지를 다시 보내기 전에 다음과 같은지 확인할 수 있습니다. stop_reasonstop_reasonfunction_call
const wantsToUseFunction =
  chat.data.choices[0].finish_reason === 'function_call';
이제 AI가 함수를 사용하는 것처럼 느껴지면(즉, 'true'인 경우) 어떤 함수를 호출하는지 확인할 수 있습니다. API에서 반환되는 객체를 확인하여 이를 수행할 수 있습니다. 문자열로 된 이름과 JSON으로 함수에 전달하려는 인수가 포함됩니다.wantsToUseFunctionfunction_callmessage
함수를 호출한 다음 반환된 데이터와 사용자의 원본 메시지를 GPT에 다시 전달할 수 있습니다. 새 메시지에 대한 역할을 할당함으로써 GPT는 이것이 사용자의 질문에 답하는 데 사용해야 하는 컨텍스트임을 이해합니다.function
참고 : 1 개 이상의 함수가있는 경우 채팅에서 두 개의 함수를 연속으로 사용하는 경우 여기에서 재귀 함수를 수행해야합니다
if (wantsToUseFunction) {
  const functionToUse = chat.data.choices[0].message?.function_call;
  let dataToReturn = {};

  if (functionToUse.name === 'getStaffInfo') {
    const args = JSON.parse(functionToUse.arguments) as any;
    dataToReturn = getStaffInfo(args.staffPosition);
  }

  // new completion API call
  const chatWithFunction = await openai.createChatCompletion({
    model: 'gpt-3.5-turbo-0613',
    messages: [
      {
        role: 'system',
        content: context,
      },
      ...chatHistory,
      {
        role: 'user',
        content: message,
      },
      {
        role: "function",
        name: functionToUse.name,
        content: JSON.stringify(dataToReturn), // needs to be JSON encoded
      },
    ],
  } as any);

  // overwrite the answer we will return to the user
  answer = chatWithFunction.data.choices[0].message?.content;
}
성공! 이제 채팅에 직원을 조회할 수 있는 기능을 제공했습니다!
모든 것을 하나로 모으기
다음은 직원 정보 함수 예제의 최종 코드입니다. 이것이 정확히 프로덕션 가치가 있는 코드는 아니지만 OpenAI와 함께 함수를 사용하는 방법에 대한 핵심 개념을 볼 수 있습니다!
export async function action({request}) {
  const body = await request.formData();

  // the user's message
  const message = body.get('message') as string;

  // the chat history (saved as a hidden input field)
  const chatHistory = JSON.parse(body.get('chat-history') as string) || [];

  const systemPrompt = `You are a helpful directory assistant.
  Users will ask questions about staff and you will reply in a friendly tone
  with the name and email of the person. If you receive a "no name found"
  response, politelty let the user know there is no one by that title who
  works here. Do not make up people. The email should be a link
  (e.g. [person@email.com](person@email.com)`;

  // initial API call
  const chat = await openai.createChatCompletion({
    model: 'gpt-3.5-turbo-0613',
    temperature: 0.2,
    messages: [
      {
        role: 'system',
        content: systemPrompt,
      },
      ...chatHistory,
      {
        role: 'user',
        content: message,
      },
    ],
    functions: [
      {
        name: "getStaffInfo",
        description: "Get the contact info of a staff member",
        parameters: {
          type: "object",
          properties: {
            staffPosition: {
              type: "string",
              description: 'The position of the desired staff member. E.g. "author" or "owner"',
            },
          },
          required: ["staffPosition"],
        },
      },
    ],
    function_call: 'auto',
  });

  let answer = chat.data.choices[0].message?.content;
  const wantsToUseFunction =
  chat.data.choices[0].finish_reason === 'function_call';

  if (wantsToUseFunction) {
    const functionToUse = chat.data.choices[0].message?.function_call;
    let dataToReturn = {};

    if (functionToUse.name === 'getStaffInfo') {
      const args = JSON.parse(functionToUse.arguments) as any;
      dataToReturn = getStaffInfo(args.staffPosition);
    }

    // new completion API call
    const chatWithFunction = await openai.createChatCompletion({
      model: 'gpt-3.5-turbo-0613',
      messages: [
        {
          role: 'system',
          content: context,
        },
        ...chatHistory,
        {
          role: 'user',
          content: message,
        },
        {
          role: "function",
          name: functionToUse.name,
          content: JSON.stringify(dataToReturn),
        },
      ],
    } as any);

    // overwrite the answer we will return to the user
    answer = chatWithFunction.data.choices[0].message?.content;
  }

  return answer;
}
이것으로 끝입니다!
이제 JavaScript를 사용하는 동안 GPT API 내에서 OpenAI 함수를 살펴보았습니다. OpenAI 함수의 목적과 유용성에 대한 기본 설명부터 시작하여 함수를 만들고 채팅 모델에 통합하는 실용적인 측면으로 이동했습니다.
요약하자면, 우리가 여기까지 오기 위해 취한 조치는 다음과 같습니다.
- OpenAI 기능의 중요성에 대해 설명했습니다.
- OpenAI 및 JavaScript에 대한 필수 구성 요소를 설정합니다.
- OpenAI API를 초기화했습니다.
- 함수를 만들고 채팅 모델에 통합했습니다.
- AI가 기능을 사용하길 원하는지 확인했습니다.
- 함수의 응답을 처리하고 그에 따라 채팅을 계속했습니다.
남은 것은 OpenAI 기능의 기능을 확장하고 실험하는 것입니다!
OpenAI 기능의 잠재력은 개인 비서 애플리케이션에서 스마트 AI 기반 교사, 데이터베이스 관리 시스템 등에 이르기까지 창의성이 허용하는 한 확장됩니다. 가능성은 무궁무진합니다.
'프로그래밍 > 자바스크립트' 카테고리의 다른 글
| 프로그래밍 「 자바스크립트 편」프론트엔드 개발자로서 따라야 할 상위 (0) | 2023.06.16 |
|---|---|
| 프로그래밍 「 자바스크립트 편」React 학습: 초보자 (0) | 2023.06.16 |
| 프로그래밍 「 자바스크립트 편」 JavaScript 개발자가 되기 위한 5가지 필수 기술 (0) | 2023.06.16 |
| 프로그래밍 「 자바스크립트 편」Let's talk JavaScript 디자인 패턴 : 모듈 및 모듈 패턴 표시 (0) | 2023.06.16 |
| 프로그래밍 「 자바스크립트 편」JavaScript에서 "this" 이해하기 (0) | 2023.06.16 |


